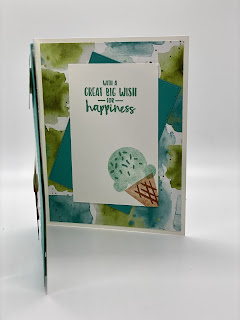
I created a shaker card the easy way using many of the items in the Ice Cream Corner Suite from the January - June 2021 Mini Catalog. This card I used Terracotta Tile color (In Color 2019 - 2021) but I will show you also in Bermuda Bay.
First you will need Whisper White (or Basic White - newer white with SU, Annual Catalog) for the base, 5 1/2 " x 8 1/2", scored at 4 1/4". Fold and burnish with your bone folder.
Cut a piece of Terracotta Tile cardstock 5 1/4" x 4" for the window. Using the Stitched Rectangles (Annual Catalog), the one that is approximately 2 1/2" x 4", I centered on the cardstock and ran it through the Stampin' Cut and Embossing Machine. Keep that piece to use for something else or decorate inside the card. You now have a frame. With the "spots" stamp from Sweet Ice Cream stamp set, using Terracotta Tile Classic Stampin' Pad, I dotted around the frame to add a little dimension. I used both direct stamping and stamping off for different shades.
The Ice Cream Corner Designer Series Paper (DSP) is beautiful with vibrant and fun colors. I cut a piece of the ice cream cone 2 3/4" x 4 1/8". I randomly placed some thick type embellishments so that the DSP would not stick to the cellophane. This makes your shaker card easier to shake. In this case I used Gold Glitter Enamel Dots (Annual Catalog).
Next, I took a small cellophane envelope that happened to be in my craft room. However, you can use SU 6" x 8" Cellophane Bags (Annual Catalog). Place your DSP with embellishments into the bag, keeping to one edge and at the bottom. Then fold the cellophane on the other edge and burnish with your bone folder. Make a good crease. If you have a lot of hangover, you can trim the cellophane. Tape down the folded part with regular Scotch Tape. The top part should still be open. Open the top, keeping the DSP toward the back and add several pinches of the Ice Cream Corner Sprinkles (however much you desire). Fold over the cellophane, burnish with the bone folder, trim off excess and tape with Scotch Tape.
Adhere your "shaker" to the frame watching the directionality of your paper. I used Scotch Tape and fully tape down all sides. Add Stampin' Dimentionals to the back of the frame and attach to you white card base. I know you are going to try the shaker part right?! I sure did 😊
Ok, let's finish up. On a scrap of Whisper White (or Basic White) with Terracotta Tile ink, I stamped with the ice cream stamp, stamping off first and then stamped onto the white scrap. Using the Ice Cream Cone Builder Punch, I punched out my ice cream top. With the ink, full strength, I stamped using the "sprinkles" stamp from the same set, onto the ice cream head. Again with the punch, I punched the cone part from the DSP paper. You can also stamp a cone and punch it out. I noticed when I punched that the edges looked white, so I took a Cinnamon Cider Light Stampin Blend and touched up the edges. With Stampin' Dimentionals, I adhered the cone to the bottom left of my shaker.
For the sentiment, I punched out the scalloped oval from the Double Oval Punch (Jan - June 2021 Mini Catalog), stamped the sentiment from the Sweet Ice Cream stamp set "Treat Yourself". I finished it with lightly sponging the edges with the Terracotta Tile ink and adhered to the upper right hand with Stampin' Dimentionals.
I finished by matting the white cardstock with 5 1/4" x 4" piece of Terracotta Tile cardstock and then added 5" x 3 3/4" Whisper White (Basic White). I used the Sweet Ice Cream stamp set to stamp a ice cream cone and the lovely Happy Birthday sentiment from this set. Such a cute card for kids of all ages!
Here's one I did in Bermuda Bay color. The sentiment is from Sweet Strawberry stamp set (Jan - Jun2021 Mini Catalog)
You can save by purchasing the bundle AND get a Sale-a-Bration item FREE if you buy before the end of February 2021. Visit my on-line store, or follow me on FB, Pinterest or Instagram.
Any questions or thoughts, please don't hesitate to contact me. I would love to help you!
Product List


Comments
Post a Comment